
Follow these simple steps to get SalesBoxPro up and running.
-
1.Create Your Account
-
Visit the SalesBox Pro website.
-
Click on the Sign Up button to register your business.
-
Provide the required details:
-
Business name
-
Contact information (email, phone number)
-
Preferred plan (Basic, Business, or Enterprise)
-
-
Verify your email address or phone number (confirmation may be required).
-
Log in to your new account via the dashboard.
-
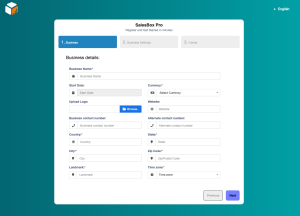
2. Configure Your Business Profile
Once inside the dashboard, customize your account to fit your business operations:
-
Business Locations: Add one or multiple shop/branch addresses depending on your plan.
-
Users & Staff: Assign staff accounts with specific permissions (cashier, manager, admin).
-
Products/Services: Upload product names, SKUs, pricing, and categories. You can bulk upload for faster setup.
-
Payment Methods: Set up payment options (cash, card, or mobile money).
3. Inventory Setup
Managing stock is critical.
-
Enter product quantities and stock thresholds.
-
Enable low-stock alerts to receive notifications before items run out.
-
Categorize products by type (e.g., drinks, clothing, medicine) for easier tracking.
-
4. Process Your First Sale
Now you’re ready to make transactions:
- Go to the Sales/Checkout tab.
- Select the product or service your customer is purchasing.
- Enter the quantity.
- Choose the payment method (cash, card, mobile money).
- Confirm and print/digitally issue a receipt.
5. Track Expenses & Reports
Beyond sales, you can track:
-
Recurring expenses (rent, salaries, utilities).
-
One-time expenses (repairs, upgrades).
-
Generate real-time analytics including revenue, top-selling items, and expense breakdowns.
